Anzahl Mails in Queue:
exim -bpc
Listing der Queue:
exim -bpr
Suchen in der Queue: siehe exiqgrep -h
Beispiel: Alle Frozen Mails loeschen
exiqgrep -z -i | xargs exim -Mrm
To delete all queued messages containing a certain string in the body:
grep -lr 'a certain string' /var/spool/exim/input/ | \
sed -e 's/^.*\/\([a-zA-Z0-9-]*\)-[DH]$//g' | xargs exim -Mrm
bash-completion for arbitrary commands
To use the completion for ssh for any command ssh * /etc/bash_completion:
. /usr/share/bash-completion/bash_completion
# set up dynamic completion loading
_completion_loader()
{
  local compdir=./completions
  [[ $BASH_SOURCE == */* ]] && compdir="${BASH_SOURCE%/*}/completions"
  # Try basename.
  . "$compdir/${1##*/}" &>/dev/null && return 124
  # Arbitrary ssh command
  [[ $1 =~ .*ssh ]] && . /usr/share/bash-completion/completions/ssh >/dev/null 2>&1 && complete -F _ssh $1 && return 124

    # Need to define *something*, otherwise there will be no completion at all.
  complete -F _minimal "$1" && return 124
} &&
complete -D -F _completion_loader
Note: completion loader was mostly extracted from /usr/share/bash-completion/bashcompletion itself, just the "# Arbitrary ssh command" part was added.
- Nächstes Thema
Configure bonding for IEEE 802.3ad (Link aggregation)
For details about bonding in general, see the Linux Ethernet Bonding Driver HOWTO
This article is the counterpart of port-channel.
Debian
/etc/network/interfaces
auto bond0
iface bond0 inet static
address 192.168.0.10
netmask 255.255.255.0
slaves eth0 eth2
bond_miimon 100
bond_mode 802.3ad
bond_lacp_rate fast


allow-bond0 eth0
iface eth0 inet manual


allow-bond0 eth2
iface eth2 inet manual
RedHat (CentOS, Scientific Linux, Fedora, ...)
For users of a ixgbe (Intel) nic: Careful with kernel releases between 2.6.194-8.1.el5 and 2.6.18-229.el5, you might run into RHEL bug #619070
/etc/sysconfig/network-scripts/ifcfg-bond0
DEVICE=bond0
IPADDR=192.168.2.12
NETMASK=255.255.255.0
ONBOOT=yes
BOOTPROTO=none
USERCTL=no
BONDING_OPTS="miimon=100 mode=802.3ad lacp_rate=fast"
/etc/sysconfig/network-scripts/ifcfg-eth0
DEVICE=eth0
BOOTPROTO=none
ONBOOT=yes
HWADDR=xx:xx:xx:xx:xx:xx
MASTER=bond0
SLAVE=yes
USERCTL=no
/etc/sysconfig/network-scripts/ifcfg-eth1
DEVICE=eth1
BOOTPROTO=none
ONBOOT=yes
HWADDR=xx:xx:xx:xx:xx:xx
MASTER=bond0
SLAVE=yes
USERCTL=no
OpenSUSE
Presumably the same issue with the kernel as for RedHat. I haven't got it to work with 2.6.27.7-9-default (openSUSE 11.1).
/etc/sysconfig/network/ifcfg-bond0
STARTMODE='auto'
BOOTPROTO='static'
BONDING_MASTER=yes
BONDING_SLAVE_1='eth0'
BONDING_SLAVE_2='eth1'
BONDING_MODULE_OPTS='mode=802.3ad miimon=100 lacp_rate=fast'
IPADDR='192.168.0.10/24'
NETWORK='192.168.0.0'
USERCONTROL='no'
/etc/sysconfig/network/ifcfg-eth0
STARTMODE='off'
BOOTPROTO='none'
USERCONTROL='no'
/etc/sysconfig/network/ifcfg-eth1
STARTMODE='off'
BOOTPROTO='none'
USERCONTROL='no'
Gather Cisco Discovery Protocol informations with tcpdump
No cdpr at hand, no problem just throw this little tcpdump line at the interface of your interest:
tcpdump -nn -v -s 1500 -c 1 'ether[20:2] == 0x2000' -i eth0
If there are more than only CDP packets you may narrow it down to the Broadcast MAC:
tcpdump -nn -v -s 1500 -c 1 'ether[20:2] == 0x2000 and ether dst 01:00:0c:cc:cc:cc' -i eth0
Oh, and don't forget to wait for up to 60 seconds.
Policy-based routing using multiple routing tables
Making a System accessible over two IPs (Interfaces) is a bit of a challenge. Say you have connected the Machine via
- eth0 192.168.0.10/24 GW: 192.168.0.1 (old)
- eth1 192.168.1.10/24 GW: 192.168.1.1 (new)
Normally all traffic to remote IPs would be routed to the default gateway. Further say your default gateway is 192.168.0.1, so it's reachable via eth0. IP packages coming in via the IP address of eth1 would be answered via the default gateway through eth0 and therefore be invalid. The Solution to this problem is called Policy-based routing (by cisco) the implementation for Linux is based on multiple routing tables. Those routing tables are registered in /etc/iproute2/rt_tables:
#
# reserved values
#
255     local
254     main
253     default
0       unspec
#
# local
#
#1      inr.ruhep
200   oldnet
201   newnet
In this case the oldnet and newnet tables are custom, here we want to migrate the Server from one Network (oldnet) to the other (newnet) and the Policy-based routing allows us to do this seamless on the server side. To use your defined tables you can simply use the ip command:
ip route add 192.168.0.0/24 dev eth0 table oldnet
ip route add default via 192.168.0.1 table oldnet
To actually use your new routing table you have to issue an ip rule command, which makes the kernel use the table according to the matched rule:
ip rule add from 192.168.0.0/24 table oldnet
Now to actually make a difference we also have to define the routing for the newnet so:
ip route add 192.168.1.0/24 dev eth1 table newnet
ip route add default via 192.168.1.1 table newnet
ip rule add from 192.168.1.0/24 table newnet
Now we have our server use the table oldnet whenever he sends out a package from the 192.168.0.0/24 subnet and use the table oldnet for packages from 192.168.1.0/24. It's important to understand the direction of the packages, it's NOT about packages comming in, they will reach the host anyhow it's all about the (answering) packages that need to go the same way back as they came from, so the from statement is the one to use here.
Now the commands ip rule list will show you the rules actually used and the ip route show table oldnet resp. ip route show table newnet will show you the actual tables. Btw. a ip route show table all will give you quite an intimate look at the routing behind the scenes, just in case you didn't know.
To make things happen at boot time there are different ways things are handle, to name the major ones:
Debian
Quite obviously you need to touch the almighty /etc/network/interfaces like this:
iface eth0 inet static
address 192.168.0.1
netmask 255.255.255.0
gateway 192.168.0.1
post-up ip route add 192.168.0.0/24 dev eth0 table oldnet
post-up ip route add default via 192.168.0.1 table oldnet
post-up ip rule add from 192.168.0.0/24 table oldnet
post-down ip rule del from 192.168.0.0/24 table oldnet


iface eth1 inet static
address 192.168.1.1
netmask 255.255.255.0
gateway 192.168.1.1
post-up ip route add 192.168.1.0/24 dev eth1 table newnet
post-up ip route add default via 192.168.1.1 table newnet
post-up ip rule add from 192.168.1.0/24 table newnet
post-down ip rule del from 192.168.1.0/24 table newnet
Redhat"ish" (Scientific, Centos, Fedora and the like)
You need to edit (or create) the files /etc/sysconfig/network-scripts/route-eth{0,1} to contain the following:
/etc/sysconfig/network-scripts/route-eth0
192.168.0.0/24 dev eth0 table oldnet
default via 192.168.0.1 dev eth0 table oldnet
/etc/sysconfig/network-scripts/route-eth1
192.168.1.0/24 dev eth1 table newnet
default via 192.168.1.1 dev eth0 table newnet
The rules are configured in /etc/sysconfig/network-scripts/rule-eth{0,1}:
/etc/sysconfig/network-scripts/rule-eth0
from 192.168.0.0/24 lookup oldnet/etc/sysconfig/network-scripts/rule-eth0
from 192.168.1.0/24 lookup newnet
openSUSE 11.1
Sadly I was not able to find a "simple" way to configure it for openSUSE 11.1. As its only a transitional Situation I live with the routing not beeing reboot-safe. *fingers crossed*
Setup a bridge on a bond
Debian 5 or later: /etc/network/interfaces
# The bridge interface.
# The lines with pre-up and post-down are to bring up the
# bond before the bridge. The '--allow "$IFACE"' parameter to
# ifup/ifdown and the corresponding "allow-br0 bond0" line aren't
# really needed, but I like them.

auto br0
iface br0 inet static
    address 192.168.1.10
    netmask 255.255.255.0
    gateway 192.168.1.1
    bridge_ports bond0
    bridge_maxwait 0
    pre-up ifup --allow "$IFACE" bond0
    post-down ifdown --allow "$IFACE" bond0

# The bond interface
# notice it's set as manual to allow the scripts in ifenslave-2.6
# package to create the master interface and enslave the slaves.

allow-br0 bond0
iface bond0 inet manual
    bond_slaves eth0 eth1
    bond_miimon 100
    bond_mode 802.3ad
    bond_lacp_rate fast

# Alternative modes:
    #  balance-rr or 0
    #  active-backup or 1
    #  balance-xor or 2
    #  broadcast or 3
    #  802.3ad or 4
    #  balance-tlb or 5
    #  balance-alb or 6

# Physical interfaces.
# Notice they are set as manual to permit you to add up/down commands
# and special directives such as wifi configurations.
# Lines beginning with allow-bond0 are required if you want to do
# something with these interfaces, otherwise you can remove both of
# them as they are brought up when they are enslaved to their master.

allow-bond0 eth0
iface eth0 inet manual

allow-bond0 eth1
iface eth1 inet manual
thx to Marco Nenciarini
Using a Bridge as a Gateway
If you want to use bridge as a gateway for other hosts you don't need to use the usual iptables nat, but you have to disable the iptableusage of the bridge altogether:
net.ipv4.ip_forward = 1

net.bridge.bridge-nf-call-ip6tables = 0
net.bridge.bridge-nf-call-iptables = 0
net.bridge.bridge-nf-call-arptables = 0
apache
Generate hosts from VHosts:
grep -h -e "^<Virtual" -e ServerName * \
| sed -e "s/^.*ServerN printf "%s", $0 ; next }Host\ //g" \
| awk '/:80>/ { {print}' \
| sed -e "s/:80>/\t/g" \
| sort {/syntax}
xdotool
Send to window named iKVM
xdotool windowactivate --sync $(xdotool search --name iKVM) type "$(printf "hello\nworld\n")"
tmux
toggle syncronization of panes (aka merge screen with clusterssh)
:set-window-option synchronize-panescreate a window
tmux new-window -dn "name-it" "command"create multiple panes
for i in {1..9}; do
  tmux split-window -t session-name:window-id "ssh server$i"
  tmux select-layout tiled
done
get the name of current session
tmux display-message -p '#S'my ~/.tmux.conf
# add prefix key to Ctrl+y
set -g prefix2 C-y


# Last active window
bind C-y last-window
bind C-p previous-window
bind C-n next-window
bind -n f7 previous-window
bind -n f8 next-window


# Sync panes on y
bind y setw synchronize-panes


# Change window move behavior
bind . command-prompt "swap-window -t '%%'"
bind > command-prompt "move-window -t '%%'"


# History
set -g history-limit 8192


# Terminal emulator window title
set -g set-titles on
set -g set-titles-string '#S:#I.#P #W'


# Notifying if other windows has activities
setw -g monitor-activity off
set -g visual-activity on


# colors
set-option -g status-bg colour235 #base02
set-option -g status-fg colour136 #yellow
set-option -g status-attr default


# default window title colors
set-window-option -g window-status-fg colour244
set-window-option -g window-status-bg default
#set-window-option -g window-status-attr dim


# active window title colors
set-window-option -g window-status-current-fg colour166 #orange
set-window-option -g window-status-current-bg default
#set-window-option -g window-status-current-attr bright


# pane border
set-option -g pane-border-fg colour235 #base02
set-option -g pane-active-border-fg colour240 #base01


# message text
set-option -g message-bg colour235 #base02
set-option -g message-fg colour166 #orange


# pane number display
set-option -g display-panes-active-colour colour33 #blue
set-option -g display-panes-colour colour166 #orange


# clock
set-window-option -g clock-mode-colour colour64 #green
mysql
Show Grants:
mysql --skip-column-names -e "select distinct concat('show grants for''',user,'''@''',host,''';') as query from mysql.user" | \
mysql --skip-column-names | \
perl -ne 'next if m/(?:replica|root)/; s/$/;/; print; END {print "flush privileges;\n" }'
or use maatkit
Show Users:
select user,host from mysql.user;
Configure bonding for IEEE 802.3ad (Link aggregation)
For details about bonding in general, see the Linux Ethernet Bonding Driver HOWTO
This article is the counterpart of port-channel.
Debian
/etc/network/interfaces
auto bond0
iface bond0 inet static
address 192.168.0.10
netmask 255.255.255.0
slaves eth0 eth2
bond_miimon 100
bond_mode 802.3ad
bond_lacp_rate fast


allow-bond0 eth0
iface eth0 inet manual


allow-bond0 eth2
iface eth2 inet manual
RedHat (CentOS, Scientific Linux, Fedora, ...)
For users of a ixgbe (Intel) nic: Careful with kernel releases between 2.6.194-8.1.el5 and 2.6.18-229.el5, you might run into RHEL bug #619070
/etc/sysconfig/network-scripts/ifcfg-bond0
DEVICE=bond0
IPADDR=192.168.2.12
NETMASK=255.255.255.0
ONBOOT=yes
BOOTPROTO=none
USERCTL=no
BONDING_OPTS="miimon=100 mode=802.3ad lacp_rate=fast"
/etc/sysconfig/network-scripts/ifcfg-eth0
DEVICE=eth0
BOOTPROTO=none
ONBOOT=yes
HWADDR=xx:xx:xx:xx:xx:xx
MASTER=bond0
SLAVE=yes
USERCTL=no
/etc/sysconfig/network-scripts/ifcfg-eth1
DEVICE=eth1
BOOTPROTO=none
ONBOOT=yes
HWADDR=xx:xx:xx:xx:xx:xx
MASTER=bond0
SLAVE=yes
USERCTL=no
OpenSUSE
Presumably the same issue with the kernel as for RedHat. I haven't got it to work with 2.6.27.7-9-default (openSUSE 11.1).
/etc/sysconfig/network/ifcfg-bond0
STARTMODE='auto'
BOOTPROTO='static'
BONDING_MASTER=yes
BONDING_SLAVE_1='eth0'
BONDING_SLAVE_2='eth1'
BONDING_MODULE_OPTS='mode=802.3ad miimon=100 lacp_rate=fast'
IPADDR='192.168.0.10/24'
NETWORK='192.168.0.0'
USERCONTROL='no'
/etc/sysconfig/network/ifcfg-eth0
STARTMODE='off'
BOOTPROTO='none'
USERCONTROL='no'
/etc/sysconfig/network/ifcfg-eth1
STARTMODE='off'
BOOTPROTO='none'
USERCONTROL='no'
Posted
Gather Cisco Discovery Protocol informations with tcpdump
No cdpr at hand, no problem just throw this little tcpdump line at the interface of your interest:
tcpdump -nn -v -s 1500 -c 1 'ether[20:2] == 0x2000' -i eth0
If there are more than only CDP packets you may narrow it down to the Broadcast MAC:
tcpdump -nn -v -s 1500 -c 1 'ether[20:2] == 0x2000 and ether dst 01:00:0c:cc:cc:cc' -i eth0
Oh, and don't forget to wait for up to 60 seconds.
Posted
Policy-based routing using multiple routing tables
Making a System accessible over two IPs (Interfaces) is a bit of a challenge. Say you have connected the Machine via
- eth0 192.168.0.10/24 GW: 192.168.0.1 (old)
- eth1 192.168.1.10/24 GW: 192.168.1.1 (new)
Normally all traffic to remote IPs would be routed to the default gateway. Further say your default gateway is 192.168.0.1, so it's reachable via eth0. IP packages coming in via the IP address of eth1 would be answered via the default gateway through eth0 and therefore be invalid. The Solution to this problem is called Policy-based routing (by cisco) the implementation for Linux is based on multiple routing tables. Those routing tables are registered in /etc/iproute2/rt_tables:
#
# reserved values
#
255     local
254     main
253     default
0       unspec
#
# local
#
#1      inr.ruhep
200   oldnet
201   newnet
In this case the oldnet and newnet tables are custom, here we want to migrate the Server from one Network (oldnet) to the other (newnet) and the Policy-based routing allows us to do this seamless on the server side. To use your defined tables you can simply use the ip command:
ip route add 192.168.0.0/24 dev eth0 table oldnet
ip route add default via 192.168.0.1 table oldnet
To actually use your new routing table you have to issue an ip rule command, which makes the kernel use the table according to the matched rule:
ip rule add from 192.168.0.0/24 table oldnet
Now to actually make a difference we also have to define the routing for the newnet so:
ip route add 192.168.1.0/24 dev eth1 table newnet
ip route add default via 192.168.1.1 table newnet
ip rule add from 192.168.1.0/24 table newnet
Now we have our server use the table oldnet whenever he sends out a package from the 192.168.0.0/24 subnet and use the table oldnet for packages from 192.168.1.0/24. It's important to understand the direction of the packages, it's NOT about packages comming in, they will reach the host anyhow it's all about the (answering) packages that need to go the same way back as they came from, so the from statement is the one to use here.
Now the commands ip rule list will show you the rules actually used and the ip route show table oldnet resp. ip route show table newnet will show you the actual tables. Btw. a ip route show table all will give you quite an intimate look at the routing behind the scenes, just in case you didn't know.
To make things happen at boot time there are different ways things are handle, to name the major ones:
Debian
Quite obviously you need to touch the almighty /etc/network/interfaces like this:
iface eth0 inet static
address 192.168.0.1
netmask 255.255.255.0
gateway 192.168.0.1
post-up ip route add 192.168.0.0/24 dev eth0 table oldnet
post-up ip route add default via 192.168.0.1 table oldnet
post-up ip rule add from 192.168.0.0/24 table oldnet
post-down ip rule del from 192.168.0.0/24 table oldnet


iface eth1 inet static
address 192.168.1.1
netmask 255.255.255.0
gateway 192.168.1.1
post-up ip route add 192.168.1.0/24 dev eth1 table newnet
post-up ip route add default via 192.168.1.1 table newnet
post-up ip rule add from 192.168.1.0/24 table newnet
post-down ip rule del from 192.168.1.0/24 table newnet
Redhat"ish" (Scientific, Centos, Fedora and the like)
You need to edit (or create) the files /etc/sysconfig/network-scripts/route-eth{0,1} to contain the following:
/etc/sysconfig/network-scripts/route-eth0
192.168.0.0/24 dev eth0 table oldnet
default via 192.168.0.1 dev eth0 table oldnet
/etc/sysconfig/network-scripts/route-eth1
192.168.1.0/24 dev eth1 table newnet
default via 192.168.1.1 dev eth0 table newnet
The rules are configured in /etc/sysconfig/network-scripts/rule-eth{0,1}:
/etc/sysconfig/network-scripts/rule-eth0
from 192.168.0.0/24 lookup oldnet/etc/sysconfig/network-scripts/rule-eth0
from 192.168.1.0/24 lookup newnet
openSUSE 11.1
Sadly I was not able to find a "simple" way to configure it for openSUSE 11.1. As its only a transitional Situation I live with the routing not beeing reboot-safe. *fingers crossed*
Posted
Setup a bridge on a bond
Debian 5 or later: /etc/network/interfaces
# The bridge interface.
# The lines with pre-up and post-down are to bring up the
# bond before the bridge. The '--allow "$IFACE"' parameter to
# ifup/ifdown and the corresponding "allow-br0 bond0" line aren't
# really needed, but I like them.

auto br0
iface br0 inet static
    address 192.168.1.10
    netmask 255.255.255.0
    gateway 192.168.1.1
    bridge_ports bond0
    bridge_maxwait 0
    pre-up ifup --allow "$IFACE" bond0
    post-down ifdown --allow "$IFACE" bond0

# The bond interface
# notice it's set as manual to allow the scripts in ifenslave-2.6
# package to create the master interface and enslave the slaves.

allow-br0 bond0
iface bond0 inet manual
    bond_slaves eth0 eth1
    bond_miimon 100
    bond_mode 802.3ad
    bond_lacp_rate fast

# Alternative modes:
    #  balance-rr or 0
    #  active-backup or 1
    #  balance-xor or 2
    #  broadcast or 3
    #  802.3ad or 4
    #  balance-tlb or 5
    #  balance-alb or 6

# Physical interfaces.
# Notice they are set as manual to permit you to add up/down commands
# and special directives such as wifi configurations.
# Lines beginning with allow-bond0 are required if you want to do
# something with these interfaces, otherwise you can remove both of
# them as they are brought up when they are enslaved to their master.

allow-bond0 eth0
iface eth0 inet manual

allow-bond0 eth1
iface eth1 inet manual
thx to Marco Nenciarini
Posted
Using a Bridge as a Gateway
If you want to use bridge as a gateway for other hosts you don't need to use the usual iptables nat, but you have to disable the iptableusage of the bridge altogether:
net.ipv4.ip_forward = 1

net.bridge.bridge-nf-call-ip6tables = 0
net.bridge.bridge-nf-call-iptables = 0
net.bridge.bridge-nf-call-arptables = 0
Posted
perl
Debugging:
$| = 1;


Wenn diese Variable auf einen Wert ungleich 0 gesetzt wird, werden Ausgaben mit print nicht gepuffert, sondern erfolgen in dem Augenblick, wo die print-Anweisung interpretiert wird. Normalerweise puffert Perl Ausgaben, um sie dann blockweise auszugeben.
Base64 encoding (e.g. smtp auth)
perl -MMIME::Base64 -e print encode_base64("text");
Home > Linux
ssh
Tunnel
Someone on the internet was actually right:
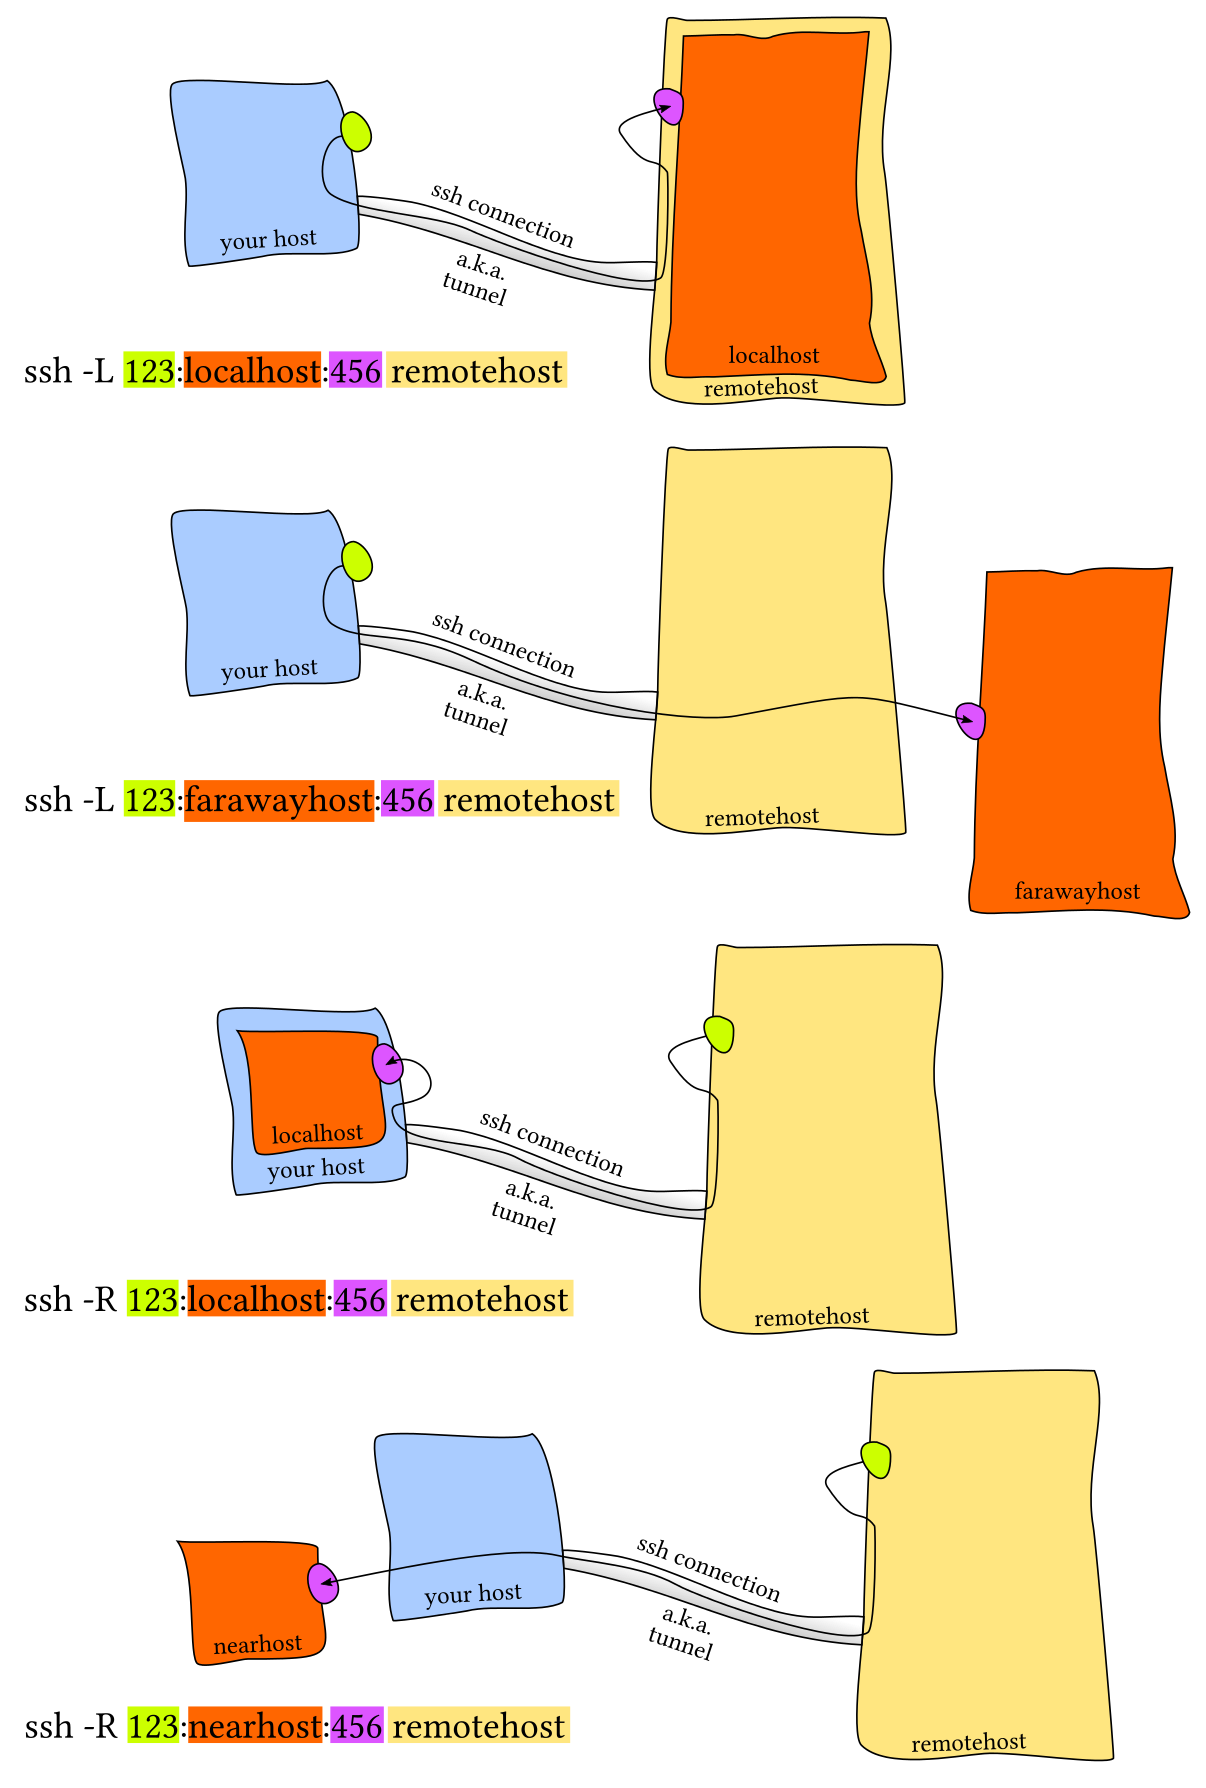
Seen on stackexchange
Remote to remote copy:
#!/bin/bash


SRC=$(cut -d: -f1 <<<$1)
SRC_DIR=$(cut -d: -f2 <<<$1)
DEST=$(cut -d: -f1 <<<$2)
DEST_DIR=$(cut -d: -f2<<<$2)


#echo "Sync $SRC_DIR from $SRC to $DEST at $DEST_DIR"


if [ $3 ] || !([ $SRC_DIR ] && [ $SRC ] && [ $DEST ] && [ $DEST_DIR ]) ;then
 echo -e "Sytax is EXACTLY:\n\n\t$0 <src>:<path> <dest>:<path>\n\nEverything else fails as you did right now."; exit 2
 fi


 ssh $SRC "tar cf - $SRC_DIR" | ssh $DEST "tar xfv - -C $DEST_DIR"
Use a ssh hop Best used in ~/.ssh/config:
Host                FarEnd
User                yakindsir
HostName            far.away.host.com
ProxyCommand    ssh -W%h:%p yakindsir@gateway.to.far.away.com
Can be stacked
Host                FarFarAway
ProxyCommand    ssh -W%h:%p FarEnd
Combined with the fabulous sshuttle inception is at hand:
sshuttle -r FarFarAway 0.0.0.0/0
strings
feature
  $ greedy match     : 1#2#3#4 -> 1#2#3
  $ non greedy match : 1#2#3#4 -> 1
  $ last column      : 1#2#3#4 -> 4
          $ last 3 line
          $ first 3 line
          $ all but first 3 lines
          $ all but last 3 lines
sed
  $ sed -e 's/\(.*\)#.*/\1/'
  $ sed -e 's/\([^#]*\)#.*/\1/'
  $ sed -e 's/.*#//'
perl
  $ perl -pe 's/(.*)#.*/\1/'
  $ perl -pe 's/(.*?)#.*/\1/'a
  $ perl -pe 's/.*#(.*)/\1/'
  $ perl -lane 'print $F[-1]' (alt. last column)
ruby
  $ ruby -pe "gsub(/(.*)#.*/,'\1')"
  $ ruby -pe "gsub(/(.*?)#.*/,'\1')"
  $ ruby -pe "gsub(/.*#(.*)/,'\1')"
awk
  $ awk -F"#" '{{for (i=1; i<NF-1; i++) printf $i "#"} print $(NF-1)}'
  $ awk -F"#" '{print $1}'
  $ awk -F"#" '{print $NF}'
bash
  $ ???
  $ ???
  $  while IFS="#" read -r -a line; do
      nb=${#line[@]}
      echo ${line[$((nb - 1))]}
     done
other tools
  $ cut -F# -f1
  $ ???
  $ rev | cut -F# -f1 | rev